Dungeon generation — from simple to complex ru en
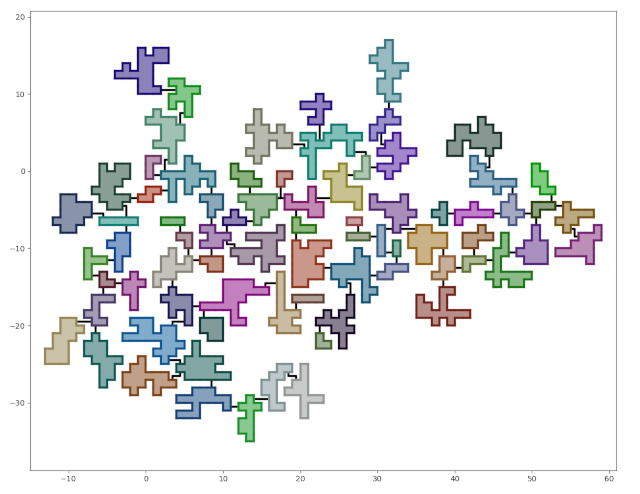
What we should get.
This is a translation of a post from 2020
This is a step-by-step guide to generating dungeons in Python. If you are not a programmer, you may be interested in reading how to design a dungeon.
I spent a few evenings testing the idea of generating space bases.. The space base didn't work out, but the result looks like a good dungeon. Since I went from simple to complex and didn't use rocket science, I converted the code into a tutorial on generating dungeons in Python.
By the end of this tutorial, we will have a dungeon generator with the following features:
- The rooms will be connected by corridors.
- The dungeon will have the shape of a tree. Adding cycles will be elementary, but I'll leave it as homework.
- The number of rooms, their size, and the "branching level" will be configurable.
- The dungeon will be placed on a grid and consist of square cells.
The entire code can be found on github.
There won't be any code in the post — all the approaches used can be easily described in words. At least, I think so.
Each development stage has a corresponding tag in the repository, containing the code at the end of the stage.
The aim of this tutorial is not only to teach how to generate dungeons but to demonstrate that seemingly complex tasks can be simple when properly broken down into subtasks.
General approach
Since we are not writing production code, we can simplify a lot of things:
- The dungeon will be placed on a grid. All coordinates will be integers. There will be almost no math.
- We'll use Matplotlib to visualize the dungeon — yes, the plotting library.
- The code will be written using a straightforward approach: no optimizations, no fancy architecture — it should just work.
- We will output the generator's results in a separate window using pyplot.show and write them to the file system. Command-line options will be available to turn these features on/off.
- We will place the code in one file. It will be easier to look at diffs; generally, there will not be so much code.
We will go from simple to complex and won't try to generate the entire dungeon from the start.
Our plan is:
- Learn to create and describe a single room cell. Let's call it a block.
- Learn to create random rooms from blocks.
- Configure the room generator to exclude ugly and/or complex rooms.
- Learn to generate two rooms and place them side by side.
- Learn to connect rooms with corridors.
- Polish the result.
However, despite the step-by-step approach, sometimes, at the early stages, we will make additional preparations for possible future tasks, relying on experience and common sense. It is a good practice to anticipate the directions of the product's development.
Step 1: preparing the environment
This step is not related to the dungeon generator itself, but it is necessary to create a comfortable development environment.
- Create a file requirements.txt with a list of the necessary packages.
- Create a boilerplate for the generator that can parse command line arguments using argparse.
- Add information about the environment setup and launching of the generator to README.md.
Github tag: step-1.
Step 2: the first block
To effectively manipulate the dungeon block, we need:
- its position;
- an object of the block itself;
- a way to get segments describing its borders;
- a way to draw the obtained segments.
The block size, like the cell size, will be set to one, and we won't even put it in constants.
We will create separate classes with meaningful names for the position and the block: Position and Block.
Apart from the Position class, we won't have any other purely geometric abstractions. Initially, I used primitives from the Shapely library, but later I found they could be removed without affecting the logic.
Points will be represented as tuples (x, y); segments and polylines — as lists of points.
The method Block.geometry_borders will return a list of segments on the block's borders. We will return a list of segments instead of a polyline because we may need individual segments later on. Also, for the needs of this tutorial, there is no difference in complexity between drawing one multi-segment line or four simple lines.
When calculating the block borders, we will assume that its position points to the lower-left corner.
Since we start drawing something, we should also add an option to specify the file name to save the image (default: last.png) and an option to
enable/disable displaying the graphics in a separate window.
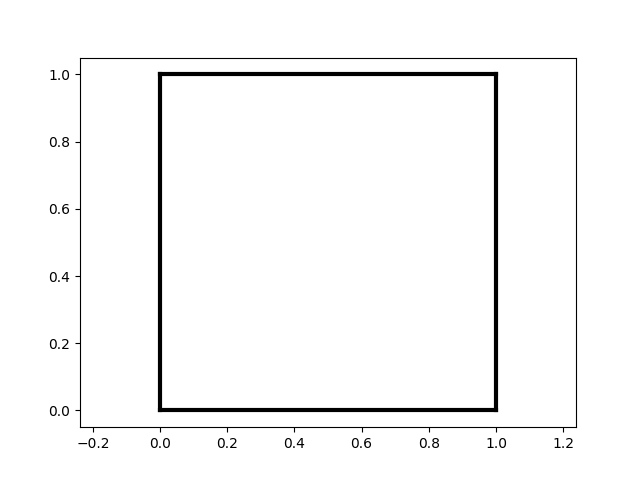
A block is a brick from which our dungeon will be built.
Perfect dungeon block :-)
Github tag: step-2.
Step 3: multiple blocks
Step 3.1: the first room
We've learned to create separate blocks, so it's time to move on to rooms. The requirements for a room are simple:
- A room consists of blocks.
- A room is a fully connected, solid space represented by a single island of blocks.
As our blocks are entirely identical, the obvious way to create a room is as follows:
- Create a room from a single block.
- Add a block to the room, adjust it to a randomly selected wall.
Let's create a Room class with a list of blocks.
The Room.expand method will add a single random block to the room.
The Room.allowed_new_block_positions method will return a list of available cells for new blocks. We will find free positions as follows:
- Teach the
Positionclass to return a set of neighboring positions. - Combine neighboring cells of all room blocks into a single set.
- Remove the cells of the blocks themselves from this set, leaving only the free cells.
To the Room class, we will add a method similar to Block.geometry_borders. For now, it will simply return the borders of all blocks.
Here is what we get:
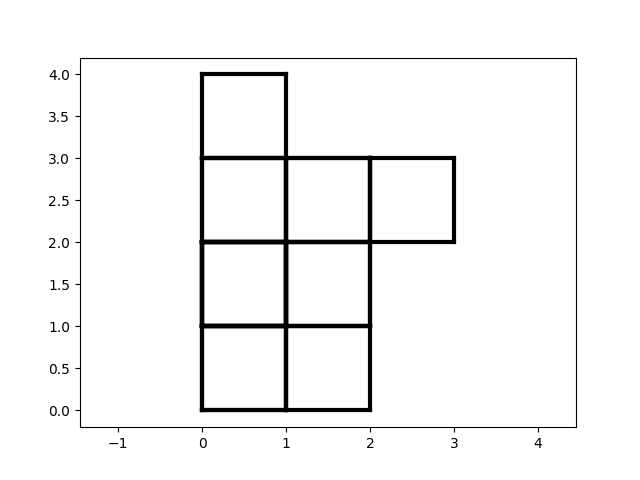
A room assembled from blocks.
Not a masterpiece, but it's a start.
Github tag: step-3.1
Step 3.2: room borders
Let's remove the internal walls.
Firstly, they make the room look ugly.
Secondly, we will need to know exactly where the room walls are. At least to insert doors and correctly lay out corridors.
To achieve this, we should organize the walls. We need:
- Position.
- Placement relative to the room: external (real) or internal (transparent).
- Direction: from which side of the wall the room is, and from which side the outer world. Let's assume that the direction indicates where the wall looks from the room. Accordingly, we have 4 directions:
LEFT,UP,RIGHT,DOWN.
Let's move the wall data into a separate Border class. Each block will have 4 walls. The Block.geometry_borders method will no longer create segments but will receive them from the (external) wall objects.
We will determine the wall position when adding a block. If a new block has a wall in common with one of the room blocks, both walls are marked as internal.
Note that comparing walls is more complex than it may seem. For example, if the blocks are adjacent horizontally, the common walls will be the right wall of the left block and the left wall of the right block. Therefore, to compare them, one must first reflect one of them, which will be done by the Border.mirror method.
To simplify working with coordinates, let's add methods:
Position.point— returns the current position coordinates.Position.move— returns a copy of the position shifted by the specified distance along the X and Y axes.
Our result:
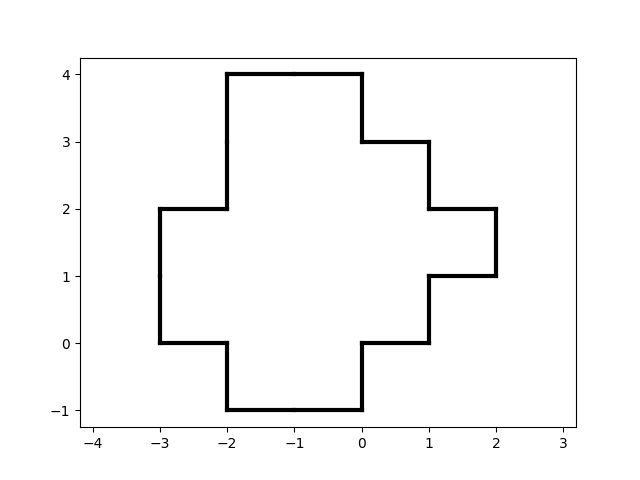
A room with internal walls removed.
Github tag: step-3.2
For fun, let's create a larger room, for example, with 100 blocks… Oops…
A large room with holes due to the nuances of the generator.
Rooms can have holes.
Step 3.3: removing holes
The cause of the holes is clear — by adding blocks to random walls of the room, we might (randomly) move in a circle, leaving a hole in the center.
Rooms with holes are neither good nor bad by themselves — it depends on their purpose — why we create them. In our case, such rooms can complicate the generator, especially its debugging. So let's get rid of them.
There can be several solutions:
- Find the holes and add blocks to their coordinates. This will increase the room size in blocks, making the generator less predictable (we want it to create rooms of a strictly defined size).
- Change the block addition algorithm… It's simple, and I like it => no.
- Consider such rooms "incorrect" and recreate them when they appear. This is our way.
Based on my experience in game development, the third approach is often very useful — it allows you to cut corners without significant risks — instead of implementing complex code, we just add "quality" check logic and a loop. Just be sure you understand the complexity of the generation.
Let's add the Room.has_holes method to check the room for holes.
The idea of the check:
- Determine the rectangle that fits the room.
- Form a set of all cells of this rectangle.
- Add the first ring of cells around its borders to the set (to ensure the connectivity of empty areas on different sides of the room).
- Remove from the set the cells occupied by the room blocks.
- Use breadth-first search (or depth-first search) starting from a random cell of the set to find all cells accessible from it.
- If the set of found cells matches the original one, there are no holes.
- If we haven't reached some cells, there are holes in the room.
Let's create a large room once again. The generator will work longer, as it will create several rooms, but in the end, it will create a correct one. For example, like this:
A large room without holes.
Github tag: step-3.3
Step 4: two rooms
Step 4.1: preparation
Making two rooms is the same as making one, just twice. So there is no problem in creating two room objects, drawing them, and seeing that:
- They intersect because each room is built starting from the position
(0, 0). - It is impossible to understand which room is where and which walls belong to which room.
Let's liave the intersection for the future. First, we need to take care of the basics:
- We need an entity that owns rooms. Let's call it
Dungeon. - We need a color differentiation of rooms. In case of errors, that will allow us to understand the problem better.
We will choose random dark colors for the rooms, as light colors on a white background will not be visible. The interval RGB from #000000 to #999999 will work well.
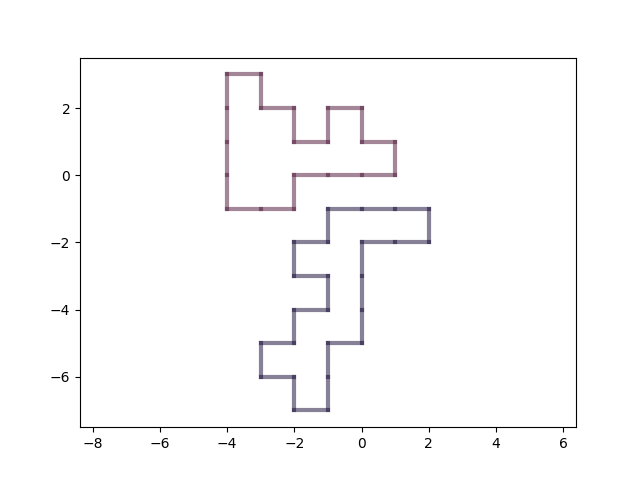
Let's make the room borders semi-transparent so we can see the wall intersections better. Mixed colors will highlight problem areas. For example, like this:
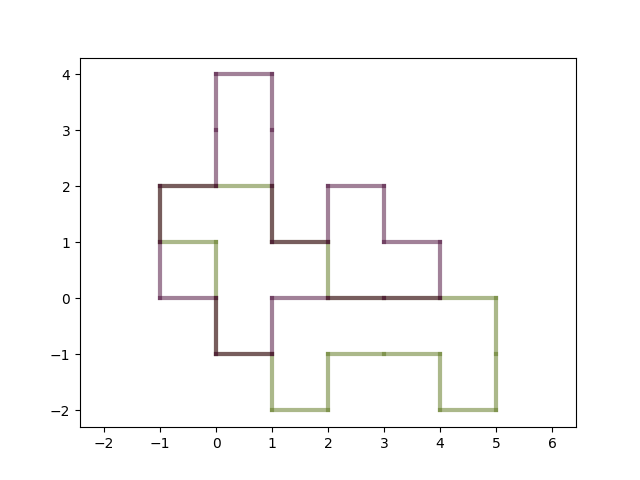
Two colored rooms that intersect (for now).
Github tag: step-4.1
Step 4.2: removing intersections
To prevent rooms from intersecting, we need to move one of them somewhere.
Since we have no doors or corridors yet, we can move rooms wherever we want. On the other hand, it is reasonable to take into account a few conditions:
- The rooms should be close to each other. A dungeon with rooms far apart looks uninteresting.
- There should be a minimum distance of one cell between the rooms to always be able to lay a corridor. Since we don't have any special requirements for corridors, we can use this heuristic to make our lives easier
Let's try to iterate over possible positions for one of the rooms until we find a position where it doesn't intersect with the other room. We will search from a certain "central" point in a spiral, checking cells at a distance of 1, then at a distance of 2, and so on.
Since we are on a grid, we'll use the Manhattan distance.
Let's take (0, 0) as the central point. We will move the second room. When we have doors, we can change this approach and search for points not from the center of the room/dungeon but from the doors.
We need:
- The
points_at_circlefunction, which returns all points at a given distance from the center. - The
Room.is_intersectmethod, which checks if the rooms intersect. - The
movemethods in all classes fromRoomtoPosition(which already has it) that will move our room (and all its parts) to a new position.
We'll search for the intersection by looking for common elements in the sets of block positions in each of the rooms. To ensure a distance of one cell between the rooms, we will add cells that encircle one of the rooms to the corresponding set (only for one room; if we add such cells for both rooms, the minimum distance will be two cells).
And here are our rooms standing separately.
Now rooms can be placed relative to each other, without intersections.
Github tag: step-4.2
Step 5: corridors
Generally, this is enough to get almost-a-dungeon. We can just connect the nearest room points with corridors and be happy.
Especially since the generator already can create a requested number of rooms (maybe not from the first try, due to the hardcoded limit on the radius for finding available positions). A multi-room dungeon without corridors can look like this:
Many rooms without corridors. Almost a dungeon.
But.
Firstly, I made a space base generator with randomly placed modules, which implies randomly placed gates.
Secondly, it is rare that "just rooms" are needed. Usually, additional restrictions are imposed on each room, affecting its shape, location, and the number of entrances. Therefore, it is necessary to place rooms respecting the position of the doors.
Let's do it.
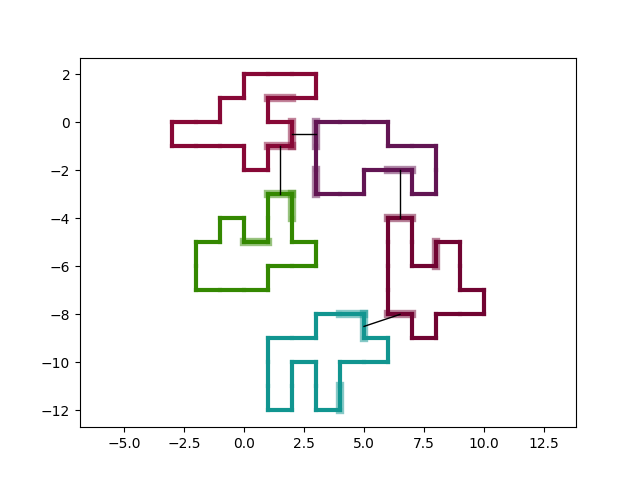
Step 5.1: straightforward implementation
What we need for corridors:
- Functionality to mark walls that have a door (or, more precisely, allowed to place one).
- Functionality to mark walls that already have a passage to another room (to avoid connecting one door to multiple rooms).
- After creating a room, immediately mark several (random) walls in it for doors.
- When adding a room to the dungeon, choose two random doors (one in the dungeon, the other in the new room), connect them with a corridor, and search for the position of the new room not from the center of the coordinates, but from the selected door.
In fact, we just need to add a couple of flags and change the function call arguments. For now, we will draw corridors as a straight line from door to door.
We'll visualize the doors with thicker semi-transparent lines.
And… It doesn't look very good.
Our first corridors.
Github tag: step-5.1
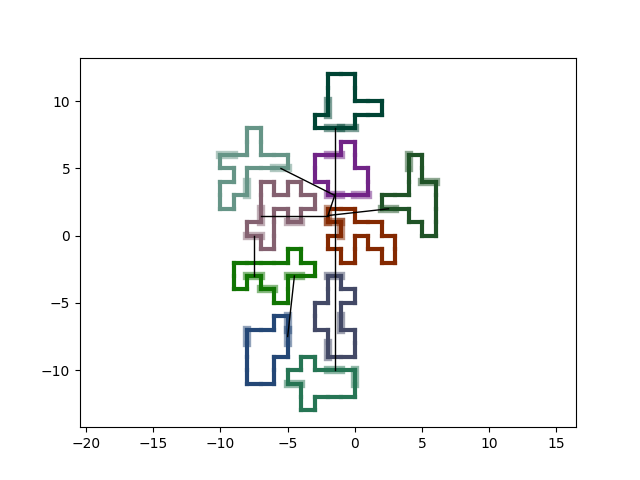
Step 5.2: improving corridors
Why the first implementation looks bad:
- The logic of room placement takes into account the geometric proximity of the doors but not the length of the corridor. For example, look at the green and light purple rooms on the left in the middle: the doors are close to each other, but the corridor should go around one of the rooms.
- Choosing random doors for connection creates a feeling of "artificiality". A live person (dungeon architect) would connect them in a more optimal way. Also, there will be problems with using doors from the inner parts of the dungeon when generating large dungeons.
Let's fix these issues:
- Instead of choosing random doors, we will check every possible combination of them.
- We will teach the rooms to rotate by 90, 180, and 270 degrees.
- Instead of checking the direct Manhattan distance, we will check the length of the shortest corridor.
As a result, we will get a relatively heavy straightforward brute-force algorithm for room placements. Approximately like this:
- For the maximum allowable distance between doors (from 1 to the allowable limit).
- For each possible combination of doors.
- For each cell on the current allowable distance from the dungeon door.
- For each possible rotation of the new room.
- If the current room position does not intersect anything and the path from door to door is no longer than the current allowable distance, choose the current room position.
Note. When moving the room, calculating paths, and other operations with corridors, we need to use the coordinates of empty cells on which these doors lead, not the coordinates of the blocks with doors.
At this point, the well-known instruction on how to draw an owl would be very appropriate.
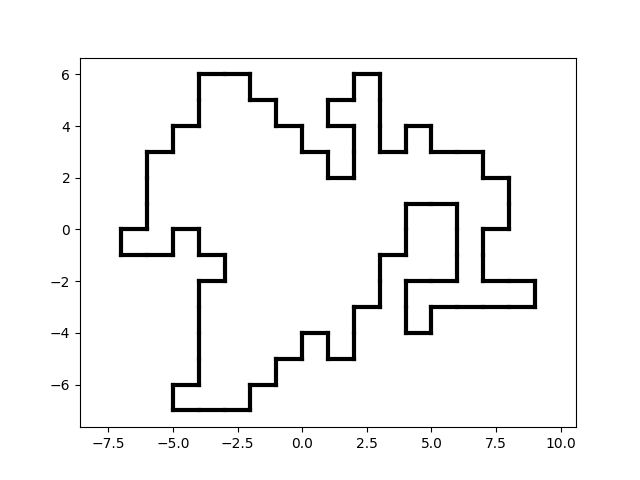
But I'm sure you'll figure it out and get something like this:
Now rooms are placed optimally to minimize the length of corridors.
Github tag: step-5.2
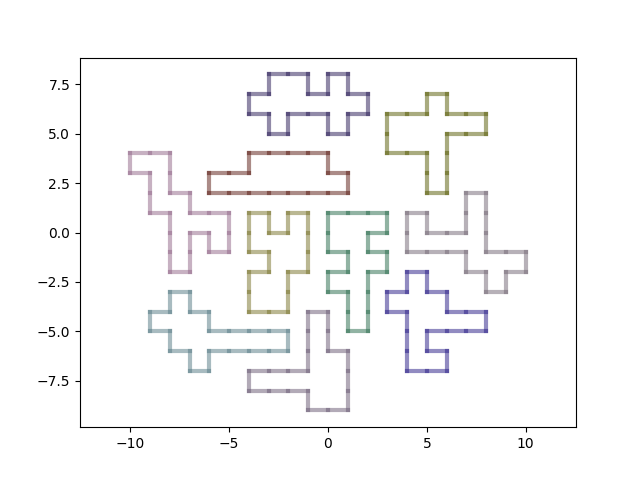
Step 6: polishing
We are almost finished. We just need to make our dungeon more attractive.
First, we will lay well-placed corridors instead of conditional sticks. Since we already have a pathfinding between doors, we just need to pass the path to the corridor object and teach it how to draw a polyline along this path.
We will display the corridors as a thick black line with a reduced z-index so that their ends will be hidden under the rest of the graphics.
We will make the drawing of doors optional and turn it off by default.
We will fill each room with its color with a transparency of 0.5.
To fill the room, we need to know the outline of the filled area. Disjoint segments will not be enough. To collect such a contour from the available segments, we will take a random segment as the first segment and look for the next segment so that it starts at the end of the previous segment. Since the contours of our rooms do not intersect, and the rooms themselves do not contain holes, each segment will have only one pair. This is implemented in the make_countur function.
We'll make the generation options more flexible by dividing the hard-coded numbers of blocks and doors into intervals. This will make our dungeons more diverse.

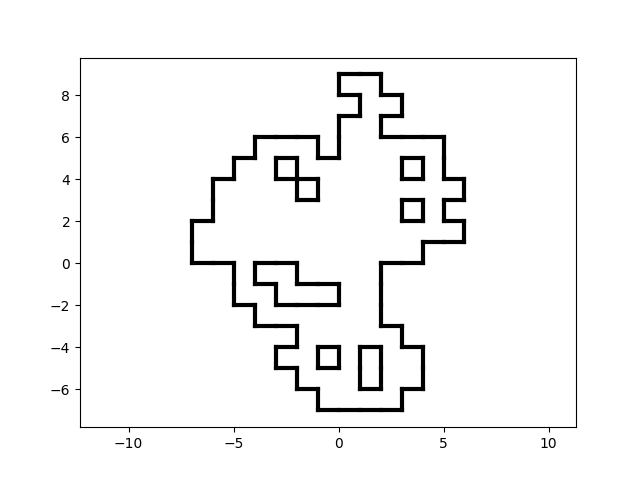
A beautifully colored dungeon.
Github tag: step-6.
What's next
We have a medium-quality dungeon generator. It is well-enough structured and quite slow. Due to its structure and simplicity, it can be easily developed further. I'll describe the most promising and interesting directions.
Optimization
As you may have noticed, I haven't done any optimizations. Up to the point that I used sets of coordinates instead of two-dimensional arrays. If you have experience with complex algorithms, you may have started twitching, or a similar reaction could have occurred. Sorry :-)
In general, the generator provides a lot of room for experimenting with algorithm optimization. Take any function with loops or sets and experiment.
Good candidates are:
find_pathRoom.has_holesDungeon.room_positions_bruteforce
Arranging rooms in cycles
A dungeon without the possibility of walking in circles is not the most interesting dungeon.
Try adding additional corridors to make it more confusing for the player.
Differentiation of rooms
Rooms can be different. There may be narrow rooms with traps, small hiding caves, large treasure troves, long caves with many turns, etc.
Try to diversify the set of rooms by improving the algorithm for generating them. You can even make several algorithms and rotate them when creating rooms.
Differentiation of doors
Doors can also be different.
Try adding "colors" for doors and allow connecting only doors of the same color.
Or try to introduce stricter rules for the placement of doors.
More complex rules for room placement
Rooms can differ not only in shape but also in the rules for their placement relative to each other.
For example, it may be necessary always to place a guard room before the treasury or generate a large treasury room with connected small dead-end rooms.
Abstracting from the cell field
There are several interesting options here.
Firstly, just as animal skeletons can be transformed to resemble each other through geometric changes like stretching, compressing, and bending, we can create different dungeon shapes by applying similar geometric transformations to our topology.
Since we know the geometry of the dungeon, we can change the shapes and positions of its elements, limiting only the transformations that lead to intersections.
Here are biology illustrations of the idea with skulls and fish:
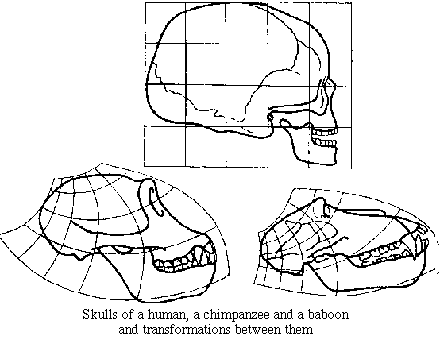
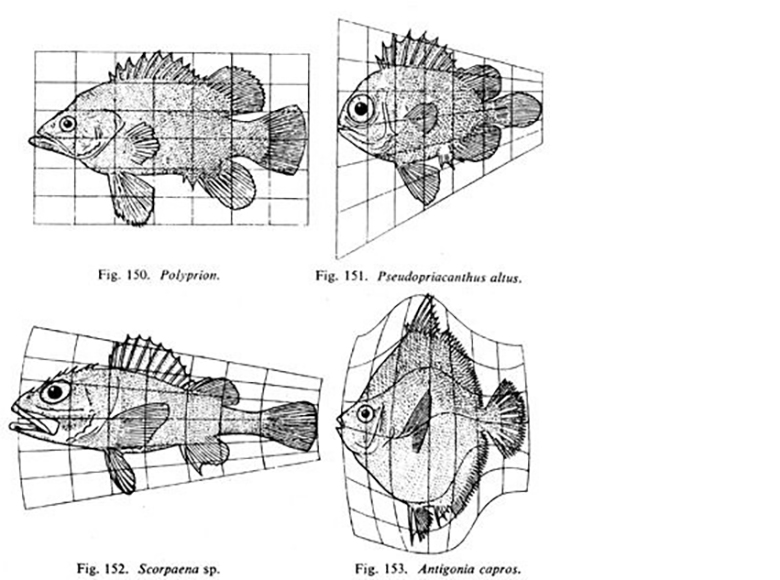
To learn more about this, read about homology. Also, there is a book On Growth and Form.
Secondly, you can change the shape of the cells themselves, for example, to hexes or any other way to cover the plane with tiles.
Thirdly, you can abstract from the cells, as they are needed only to simplify checks and generate the room shape. The logic of generation will not change.
Read next
- Generation of non-linear quests
- World Builders 2023: Simulating public opinion in a game
- World Builders 2023: Preferences of strategy players
- World Builders 2023: Preparing a business plan for a game on Steam
- How to design a dungeon
- Concept document for a space exploration MMO
- «Slay The Princess» — combinatorial narrative
- World Builders 2023: Cleaning up the results of the strategy players survey
- World Builders 2023: Procedural news headlines without complex text generation
- Using DALL-E-3 for Game Development